Compression
The Video Compression Pipeline
 Start with RGB24
 -- Convert to YUV colorspace
 -- break into blocks and DCT
 -- Quantize, drop High freq's, Mask
 -- Interframe compression techniques (motion compensation, prediction, etc...)
Colorspace
First, the video is transformed into a YV12 colorspace. There are more details as to just what that means in Colorspace, but for now, it’s enough to know that this removes half the information in an image and the loss is hardly noticeable by the eye, even when looking for it.
Frequency Transform
The next step is to transform the image into the “frequency domain” (the mathematical tool used to accomplish this is called a Discrete Cosine Transform, or “DCT”). The image is broken into square tiles or “blocks” and each block is sent through the DCT to move it into the frequency domain (this breaking into blocks is done to fascilitate the DCT, but it also comes in handy when we perform a few more tricks mentioned later…).
In the frequency domain, smooth parts of an image are represented by low frequencies and sharp edges are represented by high frequencies. This is very similar to Audio, where there are low frequencies (which we call Bass) and high frequencies (which we call Treble). Now we have another chance to remove information that won’t be noticed. Just as our eyes don’t notice the losses in the colorspace conversion, they also don’t notice a little sharpness going away, so long as it’s done in moderation.
 Image with all Frequencies |
 Image with Highs removed |
These two examples show a checkerboard pattern first with all its frequencies, and second, after the high frequencies have been removed. Just as turning the treble down makes music sound dull, removing the high frequencies from an image dulls the edges, making it look blurry. While this example is an exageration and real video compression would probably not blur the image this much, you get the idea. And it’s interesting to note that if you get up and look at these same pictures from far enough away, your eyes won’t notice the difference.
Masking
Masking is very closely related to the DCT transform mentioned above. Not only can we remove some of the highest frequencies at the price of having slightly-less sharp edges, there are also some other frequencies we can get away with removing which, again, the eye won’t notice so long as we don’t go overboard. These are so-called psycho-visual effects because the human mind and eye “tune out” certain frequencies in an image.
Similarly, in audio, a tone will “mask” energy of nearby higher and lower frequencies. The amount of masking decreases as the surrounding noise gets further in frequency from the masking tone. In addition, this masking effect does not disappear instantaneously after the tone is removed, but persists for a short time. So, if the tone stops suddenly, the masking may still occur for a few moments more. The following image is a frequency representation of a couple tones (one around 1750 Hz, and a less powerful one around 3500 Hz). The green ovals (exagerated in size for clarity) represent nearby frequencies that could probably be deleted and still not be missed.
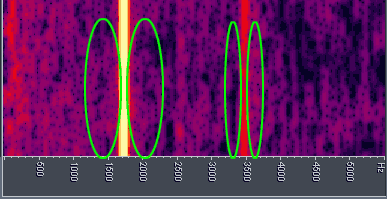 Masking Frequencies |
Visually, a very similar effect takes place. High contrast edges distract the eye from finer details near them, so if those details are removed, the eye doesn’t notice much. And if the edge goes away in the next frame, the eye takes a while to adjust, and so the next couple frames are also effectively masked. Thus, the video frame following a scene change does not have to be rendered with the same accuracy as a continuous still image.
Quantization
If we don’t want to toss out a particular frequency measure completely, we can at least use fewer bits to describe it. For example, say there are two frequencies, one with significantly more energy than the other and we have 32 bits to describe both of them with. We could use 16 bits for each, or, we could take 4 bits from the small one and give it to the large one, or even just throw out 4 bits from the small one. The first “take and give” method allows for higher quality at a given bitrate and the second “toss the bits” method allows for minutely lower quality at a significantly lower rate.
Another way of saying this is that the numbers that come out of the DCT can be rounded to convenient approximations–several of which may very well be zero. In exchange for a little loss in acuracy, we can save a lot of bandwidth.
Motion Compensation/Prediction
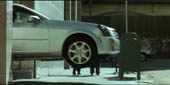
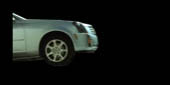
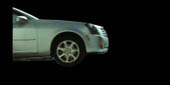
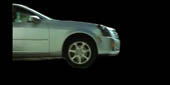
The previous tricks have all been done per frame (or intraframe) on an individual basis. The remaining tricks take advantage of redundancy between frames (interframe). For example, if the camera is standing still and a car drives by, only the car has changed per frame–the background has remained the same throughout many frames. Why paint the background with every frame? Instead, we make one frame, and then for the next several frames, we send only the parts that have changed (the car) and tell it to reference the first frame for all the other stuff.
Way back when we DCT’d the frame, it was divided into blocks, usually 8×8 (sometimes 16×16). Motion is dealt with in terms of Macroblocks, which are just 2×2 squares consisting of four of the tiles mentioned earlier. If a macroblock doesn’t change from one frame to another, there’s no reason to send it with every frame. A frame that contains an entire image is called a Key frame. Frames that only contain the changing parts of an image are called delta frames. Modern codecs have one keyframe followed by several (sometimes even hundreds of) delta frames. If there’s a scene change, then another key frame is generated. If not, then only delta frames are required. By using delta frames, we save a ton of bits and can get a big quality boost. Delta frames can be lots higher quality and still smaller than keyframes because they have far less macroblocks in them.
The first row below shows the original 4 frames of video, and the second row shows how they might be compressed using interframe compression. The first frame is a complete image, the keyframe. The next 3 frames are delta frames; only the things that have changed since the keyframe are kept. All other information is thrown out. When the video is played back, the player uses the information in the keyframe to fill in the missing parts of each delta frame.
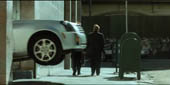 Car Frame 01 |
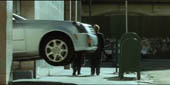 Car Frame 02 |
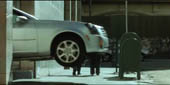 Car Frame 03 |
 Car Frame 4 |
Car Frame 01 (key) |
 Car Frame 02 (delta) |
 Car Frame 03 (delta) |
 Car Frame 4 (delta) |