SLR Photography
This document is written mainly for the beginner who wants to dive right into the good stuff, and the point-and-shooter who’s ready to move beyond the basic modes and find out what those Av, Tv, and M markings on the other side of their settings dial mean. This document does not address composition, but is more about how to use your camera.
The information is divided into two parts: the first introduces the math, science, and terminology behind everything, and the second, much shorter part, uses that information to create some simple rules of when to use what modes. You can skip to the later part if you like, I suppose, but isn’t it much more fun to read about a bunch of math and technical stuff?? (I will, however, forgive you for skipping the Advanced Explanation sections.) Finally, while non-SLR users may find useful information here, it’s written primarily for SLR users.
Part I: The Math and Science
Focal Length
Let’s begin with the Focal Length of your lens. This is a number you may have learned about in a physics class at one time or another. If you take any convex lens and hold it near a wall or a piece of paper across from a window (or any bright object), you will find a point where it focuses a clear, inverted image.
The distance from the lens to the focal plane (where the sharp image is formed–the wall in this experiment, or the sensor when our lens is mounted to the camera) is called the Focal Length and is measured in millimeters. 50mm is considered a “Normal” focal length (we’ll see why later). Lenses with shorter focal lengths (“wide-angle” or “short” lenses) give smaller images with wider views, and lenses with longer focal lengths (“telephoto” or “long” lenses) give more magnified, close up views. When a photographer describes a lens as a “50mm lens,” they are referring to the focal length (and not, for example, the diameter). That brings us to a simple rule about focal length:
The apparent size of an object varies directly with focal length–an object shot in a 50mm lens will look twice as big when shot on a 100mm lens from the same distance.
A zoom lens is simply a lens with a variable focal length. They will likely be labeled 28-70mm or some such range and the ring you rotate to zoom the lens will be marked with different numbers within this range.
Focal Length: Advanced Explanation
Technically, to measure focal length, the object you image (our window, in this case) should be infinity meters away; and further, your lens should have no thickness. But so long as it’s at least several meters away and you measure from the center of your lens, your measurement will be fairly close.
You may also have noticed that, as objects are placed closer to the lens, you have to move the lens farther from the wall to maintain a sharp image. This is how the focus on a camera works. Most lenses should have a switch to allow you to put them into manual focus mode and focus them by rotating a ring. As you adjust the focus, notice the lens moves slightly farther or closer to the sensor as you focus on objects that are closer or farther from the camera. How far your focus ring can move the lens from the sensor determines how close your subject can be to the camera. Too close, and it can’t be focused. As it turns out, if you hold the lens double the focal length away from the camera’s sensor, your object will be in focus when it is that same distance from the lens. For example, if you take a 50mm lens and position it 100mm from the sensor, subjects that are 100mm in front of the lens will be in focus. Further, at this distance, the image on the sensor will be life-size. This extreme close-up focus is called Macro and it’s how the macro mode on a camera works. And as you might guess, it’s more convenient to design lower focal length lenses for macro, since moving out to twice the focal length is less travel for a shorter lens.
Finally, a last word on why 50mm is considered “normal.” Normal is defined by what human eyes perceive. Human eyes take in an approximately 90-degree field of view. A 50mm lens on a full-frame camera also yields about 90 degrees of view, and so 50mm is considered normal. There’s also the matter of perspective–how far the background appears to be from the foreground–and 50mm yields a perspective that we perceive as normal.
So all that stuff I just said–it’s not always true anymore… It’s still true for cameras with full-frame sensors (a sensor the same size as old 35mm film frames were), but many digital SLR cameras have sensors that are smaller (so-called crop sensors–APS-C is a common size). For these cameras with smaller sensors, the lenses need to be scaled down. 32mm may be considered normal for an APS-C camera, and a 50mm would be somewhat of a telephoto lens. These cameras often come with an 18-55mm zoom lens (notice 32mm is geometrically in the middle of 18 and 55). The size difference between an APS-C sensor and a full-frame is a factor of about 1.6. This is number is called the “cropping factor.” It means that a picture taken on a camera with a crop sensor will appear to be cropped (zoomed in) by that factor when compared to the same picture shot with the same lens on a full-frame camera.
Aperture
The focal length is one of two main properties of a photographic lens that you should be familiar with. The other is the maximum Aperture, which is related to the diameter of the lens. The aperture is given in arcane units called F-stops (or “stops” for short), and denoted f/ . The maximum aperture is typically between f/1.8 and f/4 or so, depending on the lens design, and should be labeled somewhere on the front of the lens (and it will usually be variable on a zoom lens). The bigger the aperture, the smaller this number will be, and generally more aperture (a smaller f/-number) is better. A 50mm f/1.2 lens is likely a better lens than a 50mm f/1.8.
Camera lenses have an iris built into them which allows you to effectively reduce the diameter of the lens by progressively blocking off the outer area of the lens. Closing the iris (called “stopping down the lens) will increasingly shrink the hole that light may pass through, reducing the total amount of light let in, and raising the f-number. A typical progression of f-stop settings may look like:
1.8 2.8 4 5.6 8 11 16 22
These settings follow a pattern, each one letting in half the light of the previous. So f/5.6 lets in half the light f/4 does, and f/11 lets in four times the light f/22 does. Additionally, the settings listed above are each considered a full f-stop. Most cameras make aperture settings available in half-stops or even third-stops. Just remember:
Higher f/-number means smaller aperture and less light
Aperture: Advanced Explanation
The f/-numbers are actually the ratio of focal length / lens diameter (hence the f/ notation). Closing the aperture is the equivalent of using a smaller diameter lens, so the ratio gets bigger as you close up the aperture. Because light distribution follows an inverse-square law, halving the diameter (going from f/11 to f/22) reduces the light to a quarter. A 50mm diameter lens with 50mm focal length would be an f/1.0 lens. But a lens of the same 50mm diameter but with 200mm focal length would be f/4. Canon’s popular 50mm f/1.8 lens has about a 28mm diameter. Photographers refer to this as a “fast” lens because, since it lets so much light in compared to a smaller lens (say, a 50mm f/4.0), faster shutter speeds can be used with it. More on that later…
You may have noticed that longer lenses (as well as zoom lenses, and also cheap lenses) tend to have a smaller maximum aperture (that is, their lowest f/-number is still relatively high). And further, the maximum aperture changes as you zoom a zoom lens. As an example, the standard 18-55mm zoom that comes with many cameras typically only goes down to f/3.5–and that’s when it’s zoomed full wide. Zoom it to its max of 55mm, and the minimum f-stop becomes an abysmal f/5.6 (compare this to the 50mm f/1.8 mentioned above). An f/5.6 lens lets in only 1/8th the light of an f/1.8.
Why does your f/-number vary as you zoom? Keeping in mind that the focal ratio is defined as focal length/diameter, and we’re changing the focal length (but not the diameter) as we zoom, the f-ratio must also change with the focal length.
It also becomes clear why longer lenses tend to have smaller maximum apertures. A longer lens, in order to have a wider aperture, would need to be physically bigger. To create a 300mm f/1.0 lens, we’d have to have a piece of glass nearly a foot in diameter. This would be huge, and heavy, and also extremely expensive. At that size, lens makers start using other geometries similar to what telescope makers use (you can see these in the hands of professional photographers at sporting events–more on that later…).
Another way to look at all of this Aperture and Focal Length business is this: there’s only so much light passing through the lens. When you use a longer lens to create a bigger image (while keeping the lens diameter constant), you are spreading that same, finite amount of light across a bigger area–your image will have to be dimmer. A very similar effect can be seen with any projector. The farther you pull it from the screen, the bigger the image gets, but also the dimmer it gets because you only have a finite amount of light to work with.
Exposure: Shutter Speed & Aperture
To be correctly exposed, the digital sensor (what used to be the film) needs to receive the proper amount of light. Too much light, and each pixel is maxed out to white; too little, and you get just dark, fuzzy noise. There are two ways to control how much light gets to the sensor: change the aperture, and change how long the sensor is exposed to the image. There are reasons to favor one method over the other, depending on what you want to achieve visually. There’s also a third variable here, too, the “film speed”–we’ll look at all of these things later.
The aperture we know about. As for how long the sensor is exposed, that’s determined by the Shutter. The shutter is a mechanism that controls how long the sensor is exposed to the light coming through the lens. It is normally shut, and opens only for the moment you take the picture. Shutter Speed, then, is just the amount of time it’s open, in fractions of seconds. These numbers are usually denoted as whole numbers, with 250 being 1/250th of a second, 15 being 1/15th of a second, etc. The differences in shutter speeds are fairly straightforward: 1/125th second lets in twice the light as 1/250th.
Speeds of 1 second or longer are commonly denoted with a quote beside the digits: 1 second will be denoted as 1″ and 15 seconds as 15″. Without a tripod, you likely won’t be using shutter speeds this slow anyway.
Getting Correct Exposure
With this knowledge of Shutter Speed and Aperture, you are prepared to learn the single most important principle in all of this–the good stuff is coming up!
Now, you can just set your camera to fully-automatic, or the “P” mode (which stands for “Program”) and it will follow its own programming, measure the amount of light present, select what it decides is an appropriate aperture and shutter speed, and take the picture for you. The problem is, even in this age of AI this-and-that, you can never be sure what the camera will do. Sure, the exposure will probably come out right, but what if your subject was moving quickly but your camera decided to use a slow shutter speed? (You’d getter a blurry mess, that’s what!)
It turns out that other than the most extreme lighting situations, you can use a wide range of combinations of aperture and shutter speed and get a good exposure. Let’s say your camera is in Program mode and you decide to take a picture of that window from earlier. For our example, we’ll say it decides to use 1/60th of a second shutter speed and an f/8 aperture. That picture (unless your camera is broken) should come out looking fine, but we actually have the option of choosing one setting and then adjusting the other to compensate.
As mentioned earlier, adjusting by one full f-stop lets in half the light or double the light; likewise, the shutter speeds are also measured in factors of double or half the light. So, for the above shot, we should be able to change the camera’s settings from 1/60th and f/8 to, say, 1/30th and f/11; or 1/125th and f/5.6. We can continue adjusting the settings in this fashion, and exposure will still be proper–all the way up until we run into some hard limit such as the bottom of the Aperture range, or a shutter speed that’s too fast, or whatever. This is what I’d say is the fundamental rule of photography, so know it well:
If you adjust one setting, proper exposure is maintained by adjusting the other to compensate.
Asjusting the shutter speed and aperture while maintaining proper exposure is the key to getting the most out of an SLR, and is in fact is the entire reason to shoot with an SLR in the first place (because let’s be honest, these days phone cameras are pretty darn good). The following two sections address what I like to think of as “semi-automatic” modes and we’ll look at some different situations where you might want to adjust one or the other.
Shutter Speed Priority Mode
Shutter Priority mode (labeled Tv on Canons and probably similarly on yours) is a mode that lets you pick the shutter speed with the camera picking the aperture. You simply lock in the setting you want, and the camera reads how much light there is and automatically calculates the aperture for a proper exposure (smaller for more light, more open for less light–a bit like how our own eyes adjust to light).
This is the setting you’ll want to use when motion is your chief concern. Anything taken on a slow shutter speed will look blurry if it’s moving. You might use a slow shutter speed on the ocean or a waterfall to create an interesting blur effect on the moving water. Sporting events often call for fast shutter speeds in order to make sure the subject (who is often moving quickly) remains sharp. Freezing a balloon in mid-pop requires a very fast shutter speed (not to mention some darn good timing).
When not using a tripod, it’s important to keep your shutter speed high enough so that the motion of your own hands doesn’t blur the shot as it’s being taken. That brings us to an important rule of thumb:
When shooting hand-held (no tripod), try to avoid shutter speeds slower than the length of your lens.
I can hear the engineers screaming “but unit conventions!”… This rule means if you’re using a 28mm lens, you can safely get away with hand-holding the camera down to about 1/28th of a second. But if you’re zoomed to 300mm, even 1/250th of a second may be too slow to compensate for the slight wobble of the camera in an unsteady human hand. You’d need to use at least 1/300th (maybe 1/500th to be safe) to avoid hand-shake blur. Notice how much the image wobbles when you’re trying to hold a camera still at high zoom? The sensor sees that, too. Some lenses have built-in image stabilization that will allow you to bend this rule by a stop or two (that is, take clear shots down to 1/60th of a second even when zoomed at 240mm). It’s very cool tech, but will add quite a bit to the price of a lens.
You can now understand the depth of woes sports photographers suffer. They need fast shutter speeds to capture their fast-moving subjects. Fast shutter speeds require wide apertures. Wide apertures require lots of heavy, precise, and expensive glass. They also need to be able to zoom in close, which requires long focal lengths, which requires even more expensive glass to keep the aperture wide and shutter speeds fast… The lesson here is never become a sports photographer unless you have large piles of money that you’re bored with.
Limits
Shutter speeds on the fast end are generally limited to around 1/1000th of a second. This limit is determined by how fast the mechanism can open and close. On the low end, ignoring the tripod rule above, they are limited only by how long the camera decides to let you keep the shutter open. Most go down to 30 seconds. Some have a “bulb” mode (denoted B) which will hold the shutter open as long as you’re holding the switch. Coupled with remote triggering, this can be indefinite. Astrophotographers may do an hour or more (coupled with a special tripod mount that compensates for the turning of the Earth over that time).
Aperture Priority Mode
Aperture Priority mode (labeled Av on Canons) is the complimentary mode to Shutter Priority, automatically selecting a shutter speed while you select an aperture. Lock in the setting you want, and the camera does the rest.
From what we’ve studied so far, there does not seem to be an advantage to using a smaller aperture–less light simply forces longer shutter speeds, which may even force the use of a tripod. It’s time for a new concept: depth of field. The focus “field” is defined simply as what’s in focus. The field can be very narrow, or very deep, or something inbetween. A narrow depth of field means only objects at a very specific distance are in focus: someone 6 ft from the camera may be sharp, but a tree branch hanging nearer the lens is noticeably blurred, and the mountains far in the distance are completely blurred out. A wide depth of field can mean anything from 3 ft to infinity is in focus. As it turns out, depth of field is controlled by aperture. Open apertures create narrow depth of field, and stopped down apertures create wide depth of field.
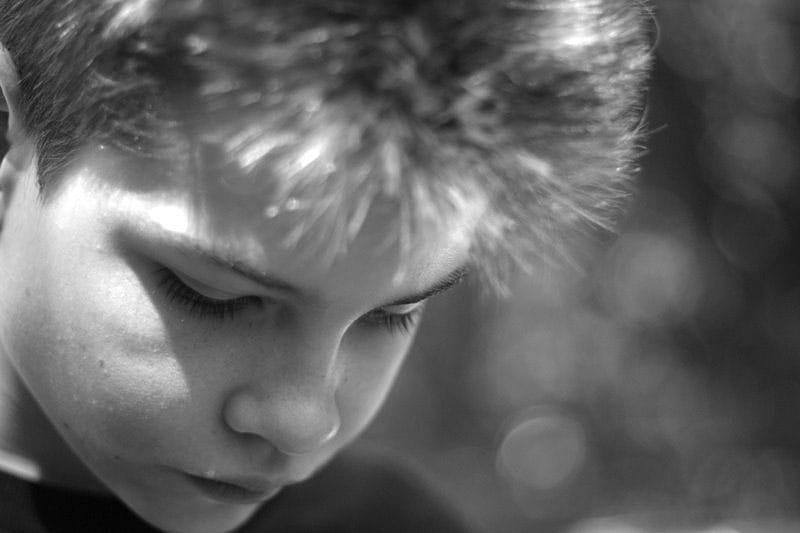
Portraits look fantastic with a wide apertures because the background is thrown completely out of focus allowing the subject to stand out and not have the background be a distraction. Incidentally, this is one reason why having a fast lens is better. If your lens only goes down to f/4.0, you simply won’t be able to blur the background out as well as a faster lens could. I find f/2.2 on my 50mm is a nice aperture to work with for portraits. That particular lens will go down to f/1.8, but sometimes the focus is so shallow that if the face of my subject is turned, one eye can be in focus while the other, at only a slightly different distance from the camera, is blurry. Phones cameras, by the way, are notoriously awful at creating shallow depth of field. So much so that AI has been introduced to fake this effect–but it’s definitely not there yet and easy to spot if you’re looking for it. To date, nothing comes close to shooting through an SLR with a good, wide aperture.
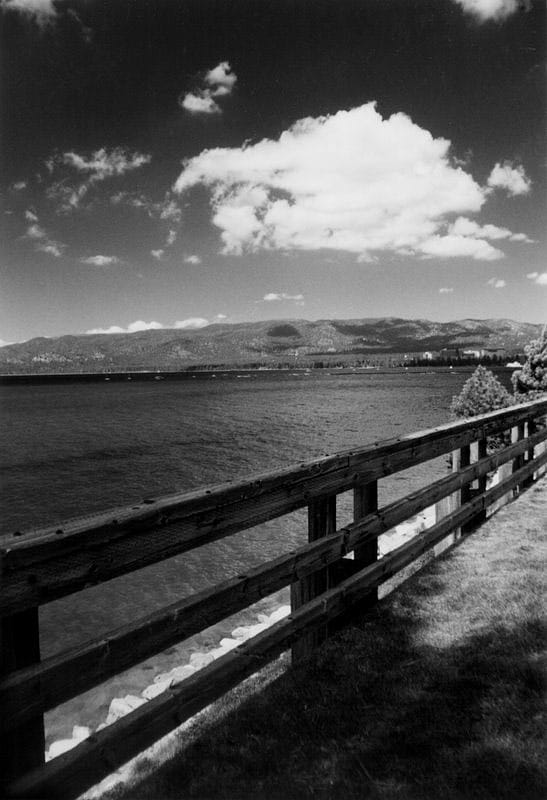
Landscapes often call for the opposite effect. You may want everything from the rocks at your feet to the mountains on the horizon to be in focus. This requires a small aperture. Here, the pitfall can be that at high aperture, your shutter speed may be forced pretty low. Often it’s not a problem because an outdoor landscape is shot in bright daylight. Still, if you anticipate using a small aperture in lower light, be ready to use a tripod.
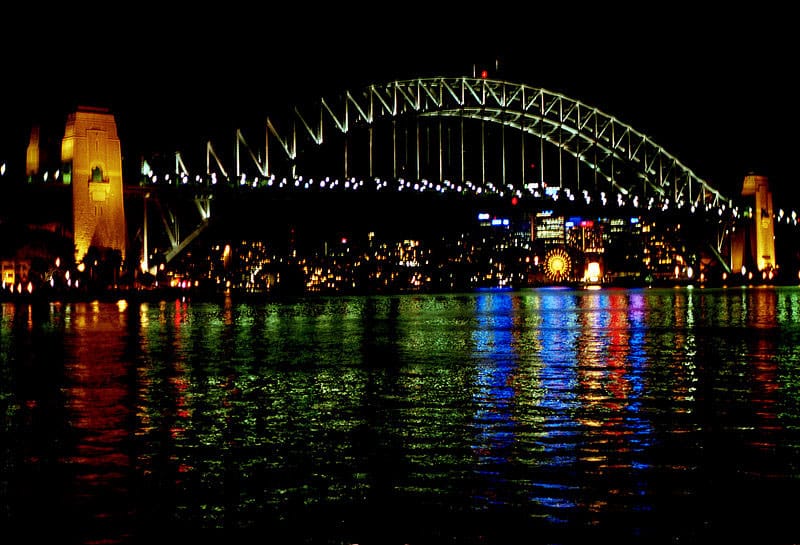
Another use for Aperture mode is in low light situations. You can lock the aperture to its maximum and know that you’ll be letting in the greatest amount of light and using the fastest possible shutter speed. A limit of this is that sometimes, the fastest is still not fast enough… you’ll want to make sure the shutter speed the camera is selecting is still reasonably fast to avoid motion blur (though there is a cheat, see next section).
One thing to know is that when taking wide depth of field shots, you need to focus between the extremes of your field. For example, if you want everything from a tree 10 ft away to mountains at the horizon (which we’ll round to infinity–take that, all you math people!), then you need to focus some place in between 10 ft and infinity at, say, 40 ft. This one just requires experimentation, so go out and play with this if landscapes are your thing (some lenses actually have guide markers that will tell you what will be in focus for a given aperture, the range widening as the f/-number goes up).
Limits
Aperture on the most wide-open end is limited by the physical proportions of the lens and is the maximum aperture already discussed, labeled on the lens. On the other end of the spectrum, it’s usually around f/22. Some lenses can go higher. Once the aperture gets too small, diffraction starts to limit things and make the image impossible to focus (at such high apertures, you’re essentially using a pin-hole camera–the lens is approximated as a flat piece of glass with no curvature).
ISO (Film) Speed
The term ISO speed used to refer to the “speed” of the film. Some film was more sensitive to light than others. If you were using ISO 400 film and your camera wanted to use 1/60th shutter speed in a particular situation, then the same exact picture would require 1/30th shutter speed with “slower” ISO 200 film (and ISO 800 would only need 1/125th). Obviously higher ISO sounds better–but you pay for it with grain. ISO 100 film takes fantastic pictures while ISO 800 film creates noticeably grainy pictures. Worst of all, if you wanted to switch, you had to finish your roll of film, first.
Now in the digital age, the situation has not changed as much as you might think. You can adjust the sensitivity of your sensor instantly (which is still measured as an ISO speed typically between 100 and 1600) with the same benefits: faster shutter speeds on higher ISO speed settings. But you’ll still suffer similar consequences–not as film grain, but as noise (which ends up being similar to grain).
Experiment with the different ISO settings and look at the difference. I recommend sticking to 400 when you can and avoid going over 800. True, there are some low light conditions that you simply can’t take a picture in without going to a higher ISO (many cameras have vastly higher ISOs available–as high as 128k), but they come out looking awful due to noise (which can be partially fixed using noise reduction in your image editing software, but it’s not a miracle cure and there’s no substitute for a high quality exposure). In the end, not a lot has changed since film:
Low light, fast shutter speed, a clean image–pick two
Exposure: Advanced Explanation
There actually isn’t a lot to say here, but I wanted to emphasize that under the hood, ISO Speed for a digital sensor is just a simple multiplier. At high ISO, all you’re really doing is underexposing, and then multiplying the results so that it falls into an acceptable digital range for your finished image file. The camera sensor, like all electronics, has a degree of background noise. If you have a good, strong signal, the noise is insignificant. But if you don’t, and you attempt to amplify your weak signal, you end up amplifying the noise right along with it.
Many cameras have a setting that allows for automatic ISO speed–adding a third variable to our rule of shutter speed vs. aperture. I recommend against using these settings, though, because in low light, they’ll let you shoot pictures just fine only to find that, once you have them up on your screen, they look terrible–and whatever noise removal you can apply tends to also delete details right along with the noise. The result is an artificial-looking mess.
Manual Mode
The last setting I’ll discuss is Manual mode. This mode lets you set both the aperture and the shutter speed. This is useful in a few rare instances. One is when you know the light is so low that even at maximum aperture, the camera is going to select a shutter speed that’s too slow. You can force the shutter speed higher. This will cause your picture to underexpose and be too dark, but at least it won’t be blurry. Again, image processing afterward can partially fix this, but not completely. Another use for manual mode is astro photography and fire works. I’m not covering those things here, but look’em up on the interweb and you’ll probably find plenty. Most cameras don’t leave you completely in the dark (sorry!) but offer some form of light metering which usually looks like:
[-2 .. -1 .. 0 .. +1 .. +2]
The idea being that when the meter is at 0, you will be properly exposed. +2 means you’ll be over-exposed by two full f-stops (or shutterspeed is 4x what it needs to be) and likewise, the minus direction means you’ll be under-exposed. Manual mode can be useful when you purposely want to over- or under-expose, or when you know the camera won’t read the situation properly (a backlit subject, for instance) and you just want to just force the setting.
Part II: The Quick and Dirty Guide to When to Use What
So with all that information, we can create a laundry list of simple rules to help us decide when to use which settings (hey look at that, I am including some actual photos in this “how to use your camera” tutorial–who knew?).
Portraits / Only Subject In Focus – Av
Aperture Mode, Around f/2.2
If you would like a shallow range of focus, use a low Aperture setting like f/2.2 or even lower. This is great for close-ups, especially of people, because it completely obscures the background.
Landscapes / Everything In Focus – Av
Aperture Mode, Higher Setting
If you want a wide range of focus, use a higher Aperture setting like f/16 or f/22. At f/22, many cameras can put anything from 6 feet all the way out to infinity in crystal clear focus. Remember also to focus “between” the closest and farthest subjects (see earlier for details). Also, remember that a small Aperture will require a longer Shutter speed; you may need a tripod.
Stuck In Low Light – Av
Aperture Mode, Low Setting
If you are in low light, and tripod and flash aren’t an option, then you pretty much have no choice but to lock the aperture to its lowest (most-open) setting and hope there’s enough light for a decent shutter speed. Also try a wider lens, stick to the shutter-speed-faster-than-lens-length rule mentioned earlier, and brace your arm against a post, if possible. Finally, you might try manual mode or a higher ISO speed to cheat the exposure a bit, as mentioned earlier.
Stuck In Low Light 2 – Tv
Shutter Speed Mode, “Safe” Setting
I prefer to use Aperture mode for low light, but you may instead switch to shutter speed mode, lock it to a “safe” shutter speed (using the shutter-speed-faster-than-lens-length rule), and then hope there’s enough light for a good exposure. The same advice applies about bracing yourself, ISO speeds, and manual mode.
Freezing Fast Moving Objects – Tv
Shutter Speed Mode, Higher Setting
To freeze motion, use a fast Shutter speed. Start at 1/125th or faster.
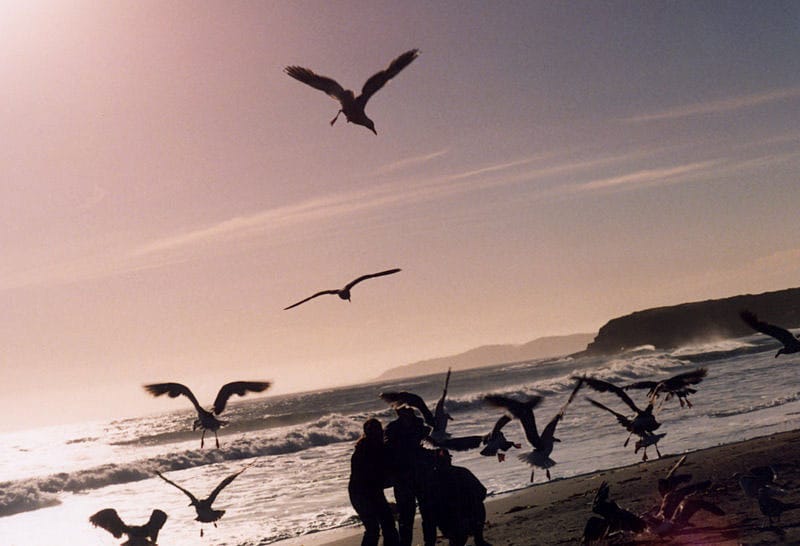
Blurring Fast Moving Objects – Tv
Shutter Speed Mode, Lower Setting
To intentionally blur a moving object, use a slower Shutter speed like 1/30th or longer. You can also create an interesting effect by following along with the object as you snap the shot (motion blurring the background against the hopefully-sharp subject).
Which Lens?
Wide angle lenses make things look smaller and farther away. Foreground objects look disproportionately larger than background objects. They can take in more of the scene so are well suited to sweeping landscape shots. They also can often focus into the macro ranges for extreme close up shots. Wide angles are less susceptible to hand-shake blur at low shutter speeds. Phone cameras, incidentally, are almost always wide or even very wide. A typical phone camera is the equivalent of an 18mm wide angle lens, though some higher end phones with multiple cameras are finally starting to carry decent lenses approaching a normal-equivalent. None, however, have a proper telephoto (generally, phones are too thin to accommodate a lens this size). Be wary of zooming a phone camera because it’s just cheating by enlarging the digital image.
Telephoto lenses make things look larger and closer. Background objects look disproportionately larger than foreground objects. Medium telephotos make good portrait lenses as they can get close shots without having to be uncomfortably close to the subject. Telephotos are often large and heavy (and expensive!). They are very sensitive to hand-shake and often require a tripod even at higher shutter speeds.
If you’re just starting off, I can’t recommend enough the good old 50mm f/1.8. It’s not a telephoto, but compared to a phone camera, it sort of is… It’s also inexpensive, an excellent introduction to the world of SLR photography, and worlds better than a phone camera. I am not at all a professional, but I do love the craft. My kit these days is a Canon 6D Mk. II, 50mm f/1.2 (a recent upgrade from the f/1.8 I just mentioned), and a comparatively ancient 70-300mm f/4-5.6 IS (Image Stabilization) Zoom. For wide-angle shooting, I confess that these days, I just use my iPhone.